|
|
|
SHARK INFO |
|
SHARK |
|
SHARK EVOLUTION |
|
|
|
SHARK DIVING |
|
SHARK DIVING 101 |
|
|
|
CONSERVATION |
|
|
|
PHOTOGRAPHY |
|
SHARK PHOTO TIPS |
|
|
|
RESOURCES |
|
|
|
WEB STUFF |
|
WHAT IS ELASMODIVER? Not just a huge collection of Shark Pictures: Elasmodiver.com contains images of sharks, skates, rays, and a few chimaera's from around the world. Elasmodiver began as a simple web based shark field guide to help divers find the best places to encounter the different species of sharks and rays that live in shallow water but it has slowly evolved into a much larger project containing information on all aspects of shark diving and shark photography. There are now more than 10,000 shark pictures and sections on shark evolution, biology, and conservation. There is a large library of reviewed shark books, a constantly updated shark taxonomy page, a monster list of shark links, and deeper in the site there are numerous articles and stories about shark encounters. Elasmodiver is now so difficult to check for updates, that new information and pictures are listed on an Elasmodiver Updates Page that can be accessed here:
|
|
_ |
|
SHARK PHOTOGRAPHY - EXPOSURE CHALLENGES |
|
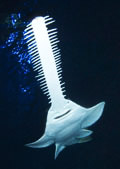
Every image has its unique exposure difficulties.
Exposure is an equation with three variables. Stay with me, its really not that tricky. All you are trying to accomplish is to get the right amount of light to hit the film or digital image sensor. The three factors that influence exposure are:
That's a whole lot of information but it condenses down to this: You want to use the slowest film speed possible, the highest (smallest) aperture possible, and the fastest shutter speed possible while still allowing enough light into the camera to freeze into a nice picture. OK, that's all well and good but it doesn't give you any real settings advice does it? That's because the lighting conditions on each dive are completely different. That's the whole reason for all those possible combinations; so that you can take advantage of different situations. What I can do is show you bunch of images and tell you what I set the camera to in each case and why. That should give you a vague starting point. Remember that you're trying to expose the background correctly with the available ambient light. This has nothing to do with making the colors show up on your subject which is done using your strobes.
|
|
|
|
|
|
|
|
|
|
Maybe that gives you a feel for some approximate settings but you don't have to guess your exposures. Lots of digital and film SLR's come with built in light meters and you can buy separate ones for those that don't. The technology is complicated but using one couldn't be simpler. All you have to decide is which part of your image needs to be exposed correctly. If you are shooting a shark in the blue then you want a nice blue background and not a shark in the dark. So assuming you have an SLR with a menu, set it on manual and point it at an empty area near the shark. When you half depress the shutter button and look through the view finder you should see a gauge that tells you if your image will be under or over exposed. Often this is displayed as a rule with minus at one end and plus at the other. Now you can play with your aperture and shutter speed until the display indicates that you are on zero (half way along the rule). Now your water will be blue but only if you shoot in that direction. If you move around the light will be different and your settings need to change. Note: your reading will get screwed up by the sun if you're pointing straight at it so make sure you're pointing at the most neutral area of the water with regards to brightness. Ok now you should have your background exposure dialed in so all that you need to do is light your subject correctly to bring out the color. If you're unsure how to do this go back to strobe use for a reminder.
|
|
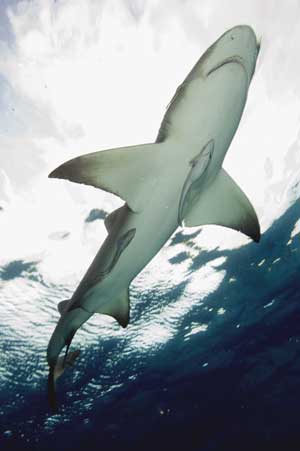
Creative exposures. Like most aspects of photography you can break the rules and end up with some pretty cool results. This Lemon shark image has a blown out background creating a sharp contrast with the shark. Its tricky to make this work because of the shark's white belly. More often than not you will end up with a half visible shark, but if you're shooting digital you can afford to play around and delete later. The important thing is to light the shark well. A silhouette shot in water this shallow is more likely to end up looking like your strobe failed than an artistic attempt. You want to over expose the background just enough to turn it almost white but not so much that it begins to flare. And, you need to crank up your strobe to expose the shark at the same level as the sky which probably means shooting on or close to full power. If your strobe isn't powerful enough to match the background light then this shot won't work. |
|
Bracketing: What your internal light meter thinks is a good light level might not look so good when you download your pics. Also, they aren't really designed to work underwater although it shouldn't make that much difference. To make sure your exposures are correct you can take extra pictures of each shot that are 1 or 2 F-stops higher and lower than your light meter deems appropriate. This is called bracketing. There are obvious drawbacks to bracketing especially for shark shooters. Firstly, you'll run out of film or memory space three times faster, and secondly, most sharks wont stop swimming to wait for you to adjust your F-stop. I don't do a lot of bracketing. I rely on my review screen that shows me a histogram of my digital image. It shows me if any areas of my picture are completely blown out. Be careful when using this as your reference because the back lighting on these little screens often make your images appear brighter than they really are. If you're more or less on the money, a little tweak in Photoshop will help you get it looking just right. If you are shooting in RAW (a file type available in all new DSLR cameras) the camera will gather more information than you can see just by reviewing the image. So, in photoshop you can bring out the hidden over or under exposed info until your image looks how you intended it to. There are limitations; you can't turn a black picture into a brightly lit masterpiece but the RAW file capabilities will certainly help with minor adjustments. Many pro shooters still bracket believing that its better to be safe than sorry. |
|
|
|

|
|
|
SHARK TRIPS |
 |
 |
 |
 |
 |
 |
 |
 |
|
MORE EXPEDITIONS |
 |
 |
 |
 |
 |
 |
 |
 |
 |
 |
 |
 |
|
|
|
SPONSORS |
 |
|
|
|
ADVERTISERS |
|
|
|
|
|
ELASMO-BLOGS |
|
|
|
|
|
|
|
|
|
|